ORDER One Piece Patio Chair | Replacement Slings
Patio Chair Replacement Slings
CURRENT LEAD TIME IS 2-3 WEEKS!

Click on the buttons below to read important instructions and detailed information about how to order new replacement slings.
![]()
![]()
![]()
![]()
![]()
![]()
X
How To Measure for New Patio Chair Slings
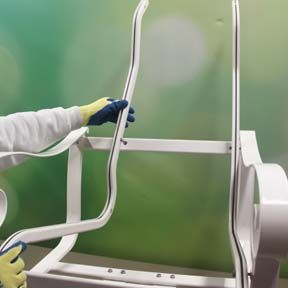
The most important part of the replacement sling process, aside from selecting a great new patio sling fabric, is the replacement sling measuring process. As they say, measure twice and cut once! No need to be intimidated by measuring your patio chair. It's relly quite easy. You will need a flexible measuring tape, or tailors tape. This kind of tape measure works better than a metal measuring tape. The cloth tape is flexible and can easily follow the curve of the chair frame.
Use a soft measuring tape for best results.

You will take 3 measurements from the patio chair frame.
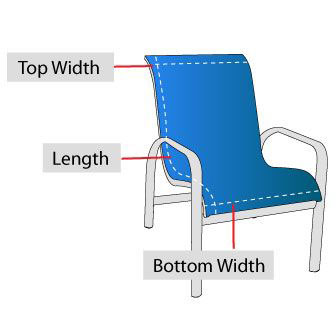
Top width, bottom width and length.
Make sure that the metal rails, aka sling rails, that hold the sling to the frame are tightly installed. Check all the bolts that secure the rails to the frame and make sure they are not acceptionally loose.
Do not measure the old sling that has been taken out of the frame. This will not be an accurate measurement. Over time, the old sling fabric has lost its stretch or flexiblity. We can not guarantee your new replacement sling will fit if you measure the old fabric sling.
Takes your measurements a few inches down from the end of the sling rail. Over time, with the weight of the body, the metal rails can change position and be uneven at the very ends. It's best to take the measurements a few inche in from the end where the rails will be every and parallel from side to side.

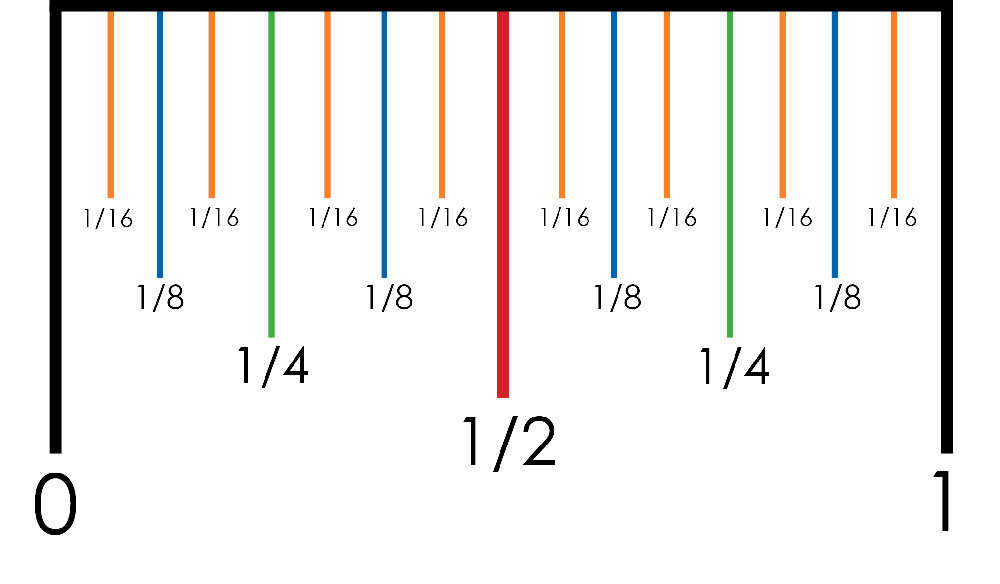
Most of the time, (99.99999%) the top width and bottom width of your patio sling chair should be the same. Or pretty close. You may find that either width is not exactly the same and that's ok. It might be off by a very small amount. Don't worry. When in doubt, round UP to the closest 1/4".
For example, if the top width measures 21 3/8" then round up to 21 1/2.
Example of rounding up.
If your measurement is:
- 20 1/8" then round UP to 20 1/4"
- 20 3/8" then round UP to 20 1/2"
- 20 5/8" then round UP to 20 3/4"
- 20 7/8" then round UP to 21"
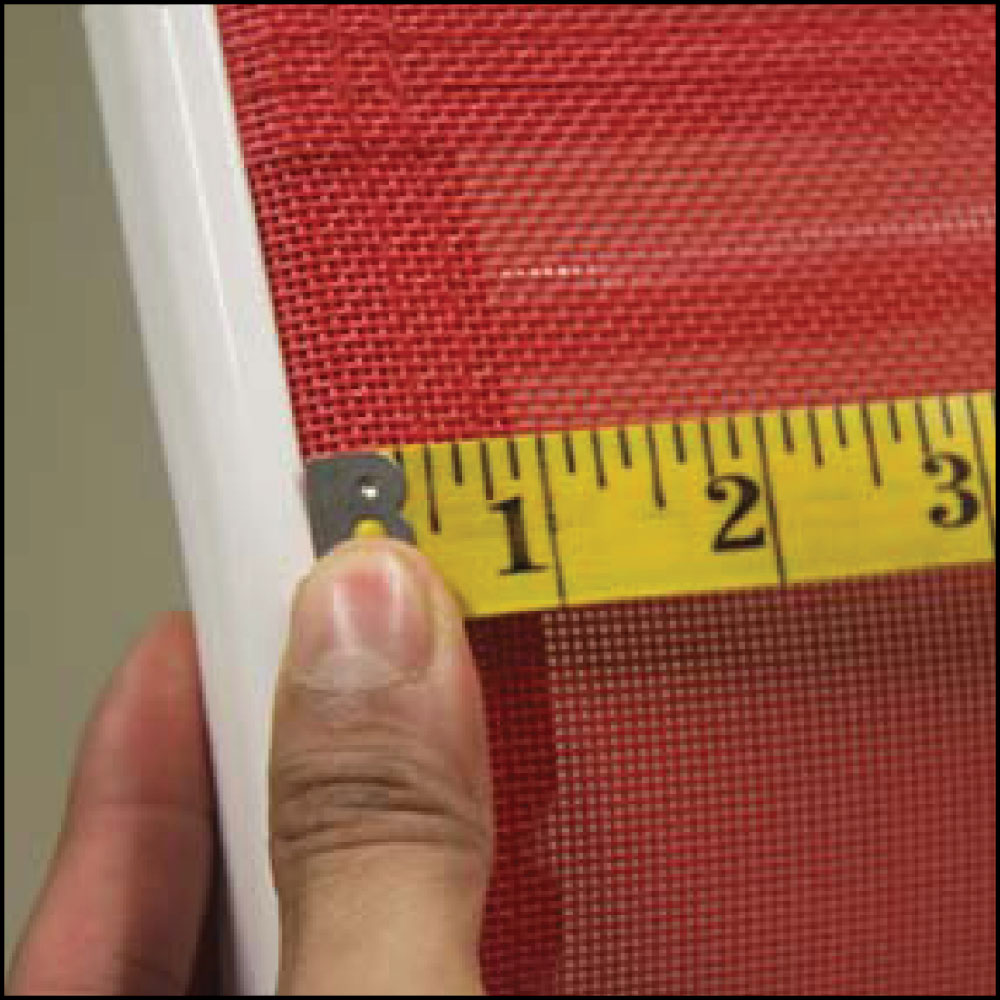
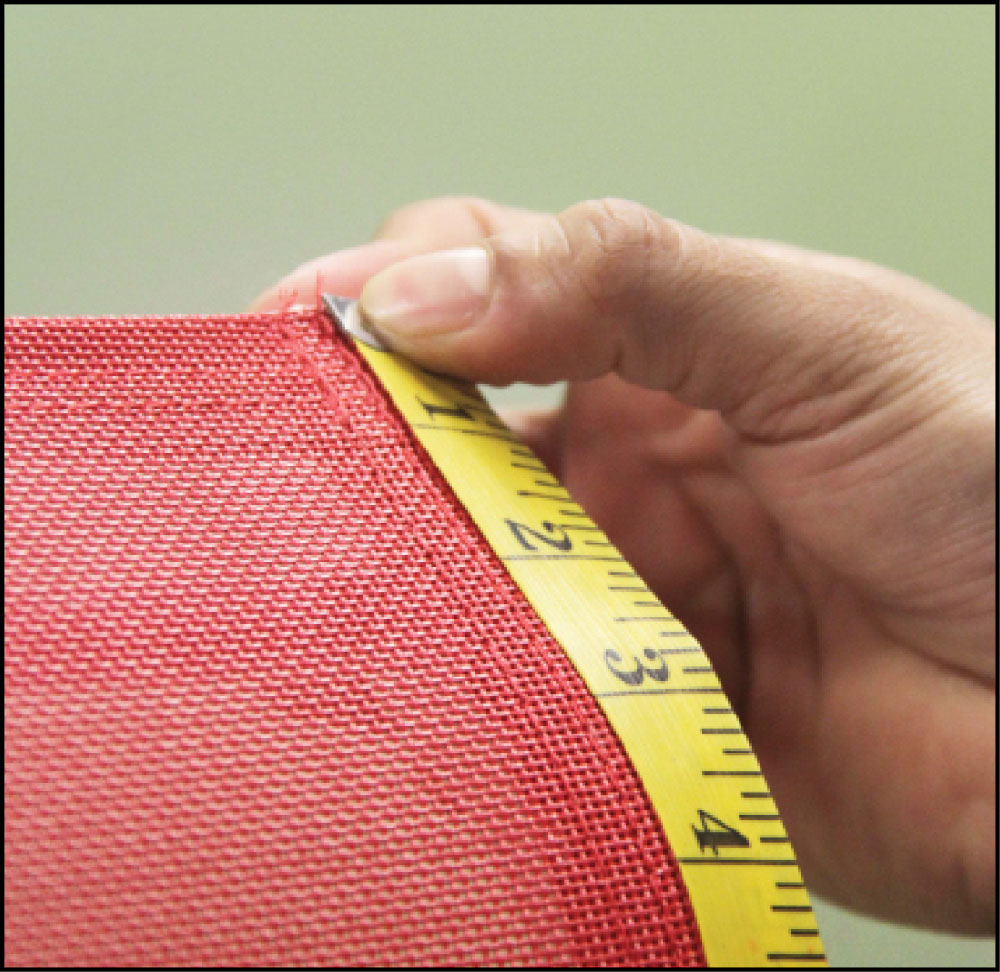
Step One - Measuring the top width of your sling chair frame.
Starting at one side of the sling chair frame, a few inches down from the end of the sling rail, as instructed, measure across the patio sling chair frame and fabric to the other side of the frame.
Measure from the edge of the metal where the fabric disappears into the metal rail to the other side. Some one to help you measure and hold one side of the tape measure can be helpful. Team work is the best course of action! Make sure your tape measure is taught and flat against the old sling fabric.
DO NOT measure the old sling that is not installed in the patio sling chair frame.
DO NOT add anything to the measurements from rail to rail and the length. We understand that there is fabric inside the rail that you can't see and each patio sling has hems on all 4 sides. We add the necessary fabric for seam allowances and stretch.
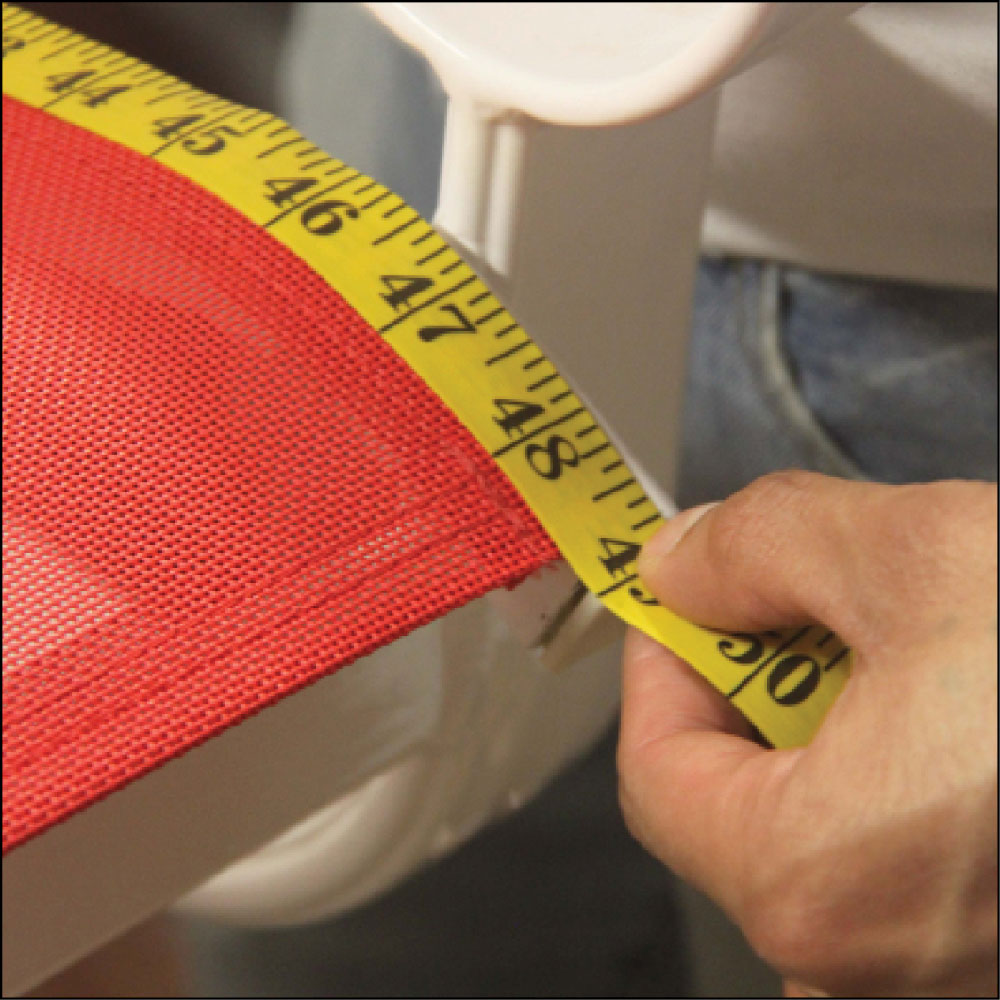
Step Two - Measuring the bottom width of your sling chair frame.
Starting at one side of the sling chair frame, a few inches UP from the end of the sling rail, as instructed, measure across the patio sling chair frame and fabric to the other side of the frame.
Measure from the edge of the metal where the fabric disappears into the metal rail to the other side. Make sure your tape measure is taught and flat against the old sling fabric. Measure to the closest 1/4". When in doubt, round UP.
For example, if the bottom width measures 19 7/8" then round up to 20".
DO NOT measure the old sling that is not installed in the patio sling chair frame.
DO NOT add anything to the measurements from rail to rail and the length. We understand that there is fabric inside the rail that you can't see and each patio sling has hems on all 4 sides. We add the necessary fabric for seam allowances and stretch.
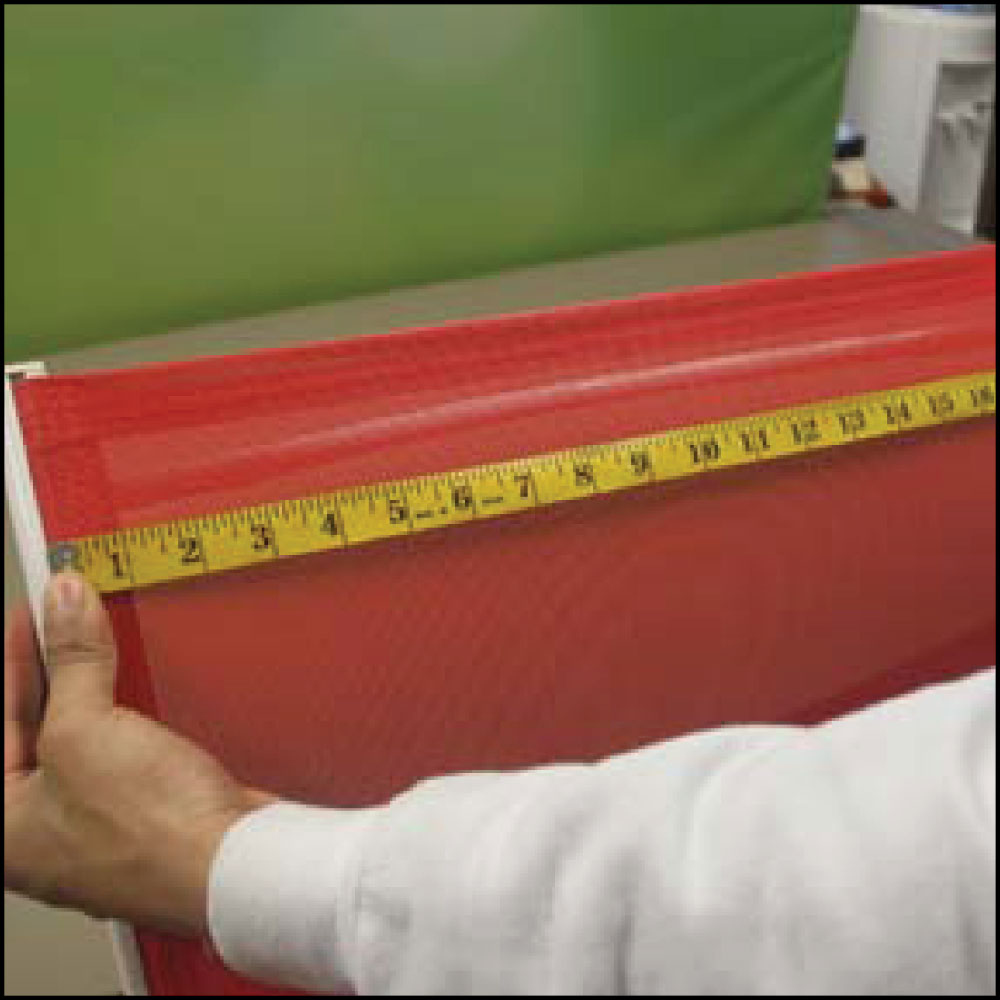
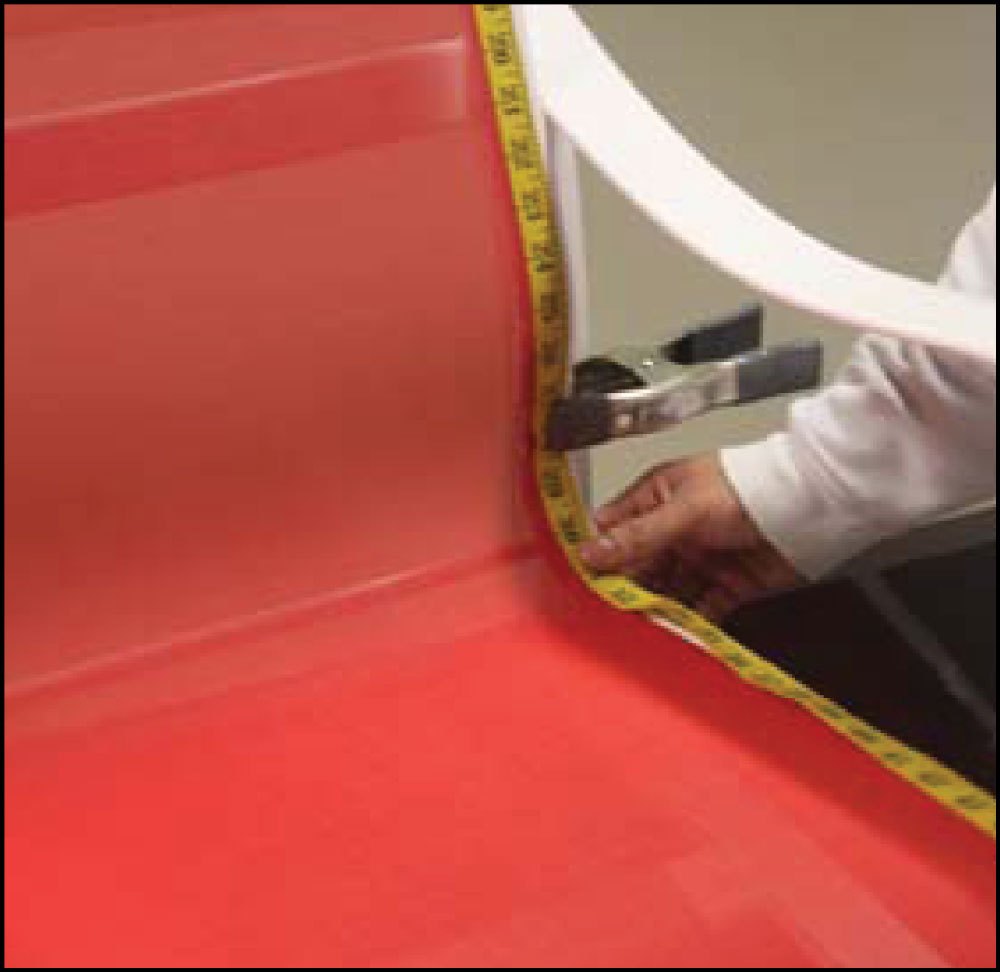
Step Three - Measuring the overall lenght of your old patio sling.
In this case, having someone else to hold the end of the measuring tape is very helpful. You want your flexible tape measure to follow the curve of the chair, keeping the measuring tape, flat against the rail or fabric as your work your way down the frame. You can also use a clamp to hold the measuring tape in place if you are working alone. Take your time measuring and repeat the process until you feel your measurements are accurate and ready to go.
When measuring the length, make sure to measure the RAIL, not the old sling. From the weight of the body over time, the sling fabric can work its way up the rail and may not be stretched in place. If you measure the actual metal rail, then your new replacement sling is sure to be long enough when installed.
DO NOT measure the old sling that is not installed in the patio sling chair frame.
DO NOT add anything to the measurements from rail to rail and the length. We understand that there is fabric inside the rail that you can't see and each patio sling has hems on all 4 sides. We add the necessary fabric for seam allowances and stretch.
REMINDER
DO NOT measure the old sling that is not installed in the patio sling chair frame.
DO NOT add anything to the measurements from rail to rail and the length. We understand that there is fabric inside the rail that you can't see and each patio sling has hems on all 4 sides. We add the necessary fabric for seam allowances and stretch.
X
How To Install New Replacement Slings on A Patio Sling Chair
These instructructions offer a general guideline for sling installation. Your chair may differ from the one depicted here but the general concept remains. Feel free to contact us with installation questions.
Note: Take careful note of how your chair comes apart. If you own a digital camera it would be beneficial to take photos of your chair before disassembling.
Sling Chair Install Process
Tools you need:
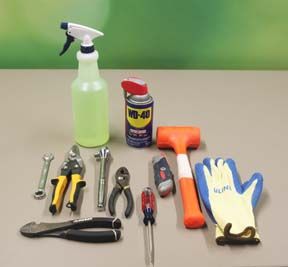
- Hammer
- Pliers
- Wire Cutters or Scissors
- Ratchet and Socket or Allen Wrench
- Utility Knife
- Flat Head Screwdriver
- Watered Down Dish Soap
- Penetrating Olil
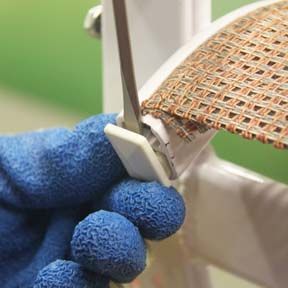
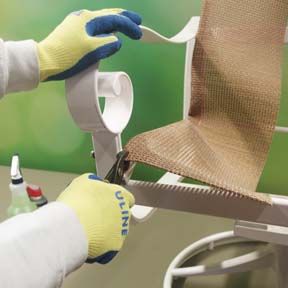
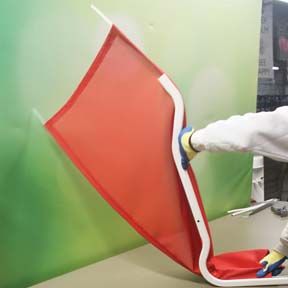
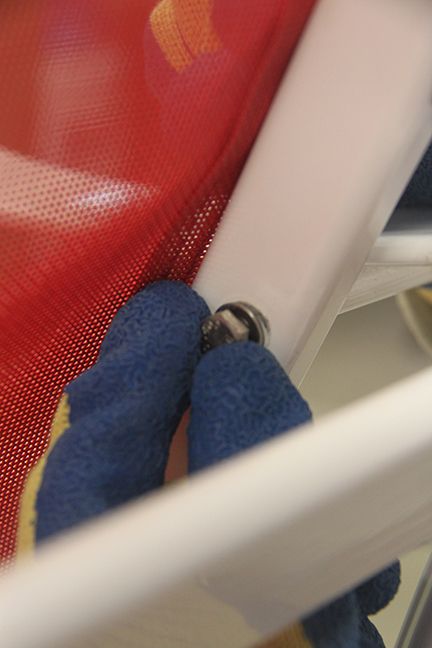
Step 1 - Remove the End Caps.
Using a flat head screwdriver or pliers, gently remove the plastic end caps from both ends of the sling rails. Be careful when removing your old end caps, they are often dry, brittle and break easily. Be sure to save these for reinstallation.
Step 2 - Remove the Old Sling Material
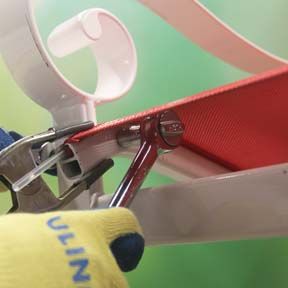
The easiest way to remove the old sling is to slice it down the middle using a utility knife or heavy duty scissors. If you choose not to destroy your old slings by cutting them in half, unbolt both sling rails before proceeding. It is not uncommon for the sling to be stuck inside the sling rail. Using both hands, break the sling free by pushing it back inside the sling rail. Spray the edge of the sling rail with watered down dish soap. The soap helps to loosen the old material from the sling rail, making it easier to remove. Give the soap a minute or two to absorb before proceeding. Grasp the sling by hand or using a pair of pliers and strip it from the sling rail. If the sling does not detach, break the fabric loose with a flat head screw driver.


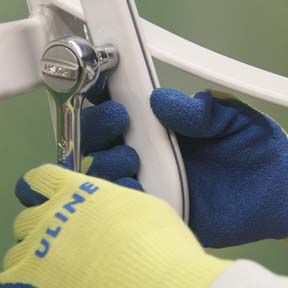
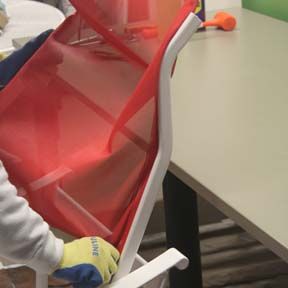
Step 3 - Remove Hardware.
One or both of the sling rails will be attached to chair frame with bolts. Using the appropriate tool, remove all bolts (typically 4-6). If your bolts prove difficult to remove, spray them with a penetrating oil (Liquid Wrench, NAPA 6300). The oil will help to loosen any rust or corrosion on the bolt. Let the oil soak for at least an hour before proceeding. Save bolts and any other hardware for reinstallation. If your bolts are bent or rusty it is a good idea to replace them.
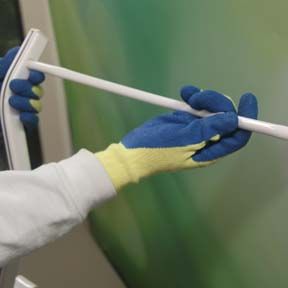
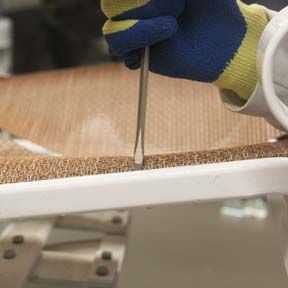
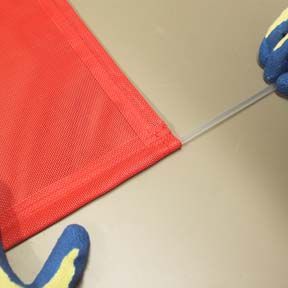
Step 4 - Insert Sling Spline.
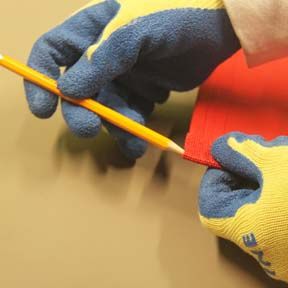
The slings will be shipped without the plastic sling spline installed. Insert the sling spline in to each side of the sling. The spline will be longer than necessary; do not trim away the excess until later in the installation process. If you are having trouble inserting the sling spline, try sharpening the end in a pencil sharpener. A pointed end tends to slide easier. You can also use a pencil to widen the entry point of the sling hem.
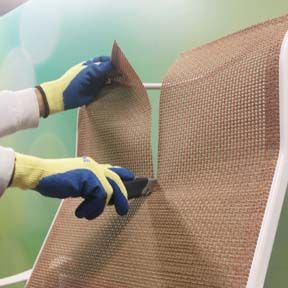
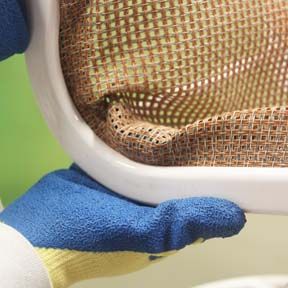
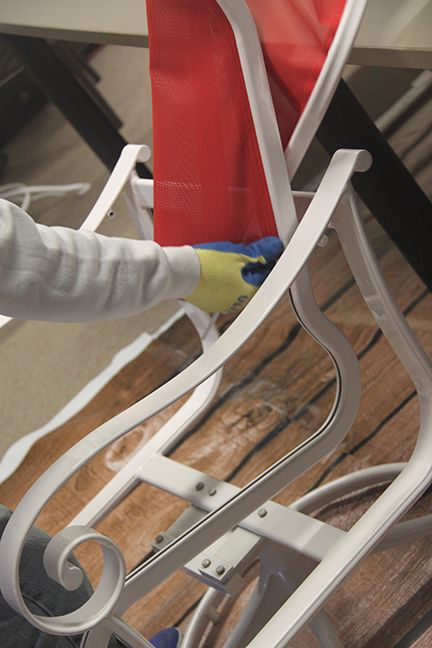
Step 5 - Insert Material Into the Sling Rails.
Before sliding the sling into the rail, make sure the rails are in the same position as they were before they were removed. Slide the fabric through the sling rails Slide the fabric into the loose slide rail first. Slide the fabric into the mounted rail starting from the top down
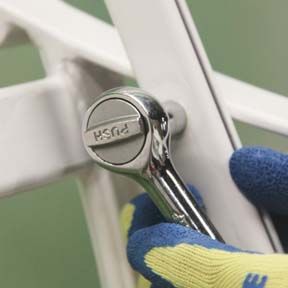
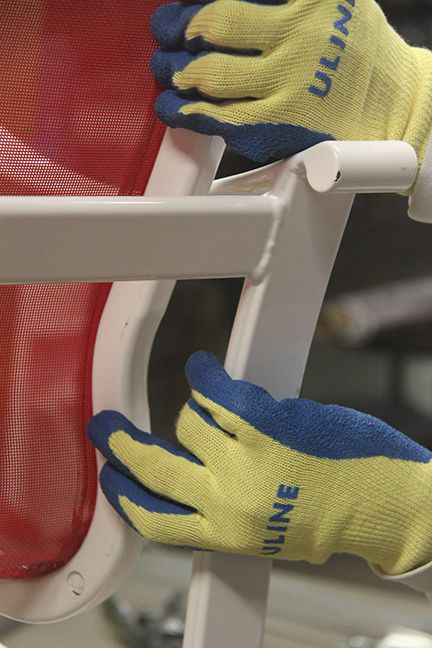
Step 6 - Start All Bolts.
Line up the holes in the sling rails with the chair frame. Loosely secure the bolts but do not tighten the bolts just yet.
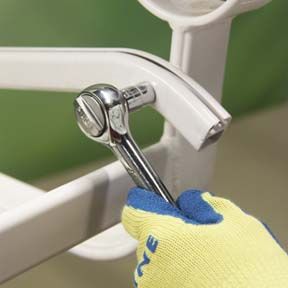
Step 7 - Tighten Bottom Bolts.
Starting with the bottom of the chair, pull the sling downwar until it is even with both sling rails. Once the sling is flush with BOTH sling rails, tighten only the two bottom bolts at the front of the chair. This will keep the bottom of the sling tight and in place.
Step 8 - Stretch the Sling Material and Tighten.
Eliminate any wrinkles left in the bend of the seat by stretching the fabric upward.
Note: It may be helpful to use a pair of clamps to hold the fabric as it tends to slip back down the sling rail. If you do not have clamps available, having someone to help with this step may prove useful.
Position yourself behind the chair. Using pliers, stretch the sling upward to the edge of the sling rail so that both fabric and sling rail are even. At this point, use clamps or have someone hold the sling in place while you tighten the remaining bolts. The sling should now be tight and free of wrinkles. Repeat this step on the other sling rail.
Step 9 - Tighten the bolts.
With the fabric in place, tighten down the remaining bolts on the chair frame. It may help to alternate bolts to alleviate stress on the threads. It may be easier to lay your chair on its side during this step.
Step 10 - Reinstalling Spreader Bars.
If your chair was equipped with spreader or tension bars, they must be reinserted. Fli your chair upside down being careful not to scratch the arms. Try bending the spreader bar over you knee. Some curved bars can be bent over a knee or by using a mounted wor bench vise for leverage. If possible, bent the bars just enough to fit within the sling rails. You won’t be able to pry the bar ito place. Using a rubber mallet, tap the bar in the center to add tension to the rails. Repeat this step on the remailing tension rods.
If your spread/tension rod is straight, or too thick to bend, the menthods in step 10 will not work.
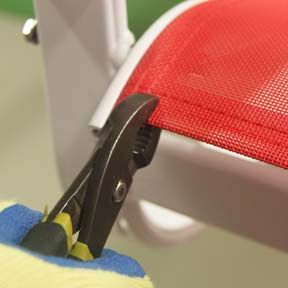
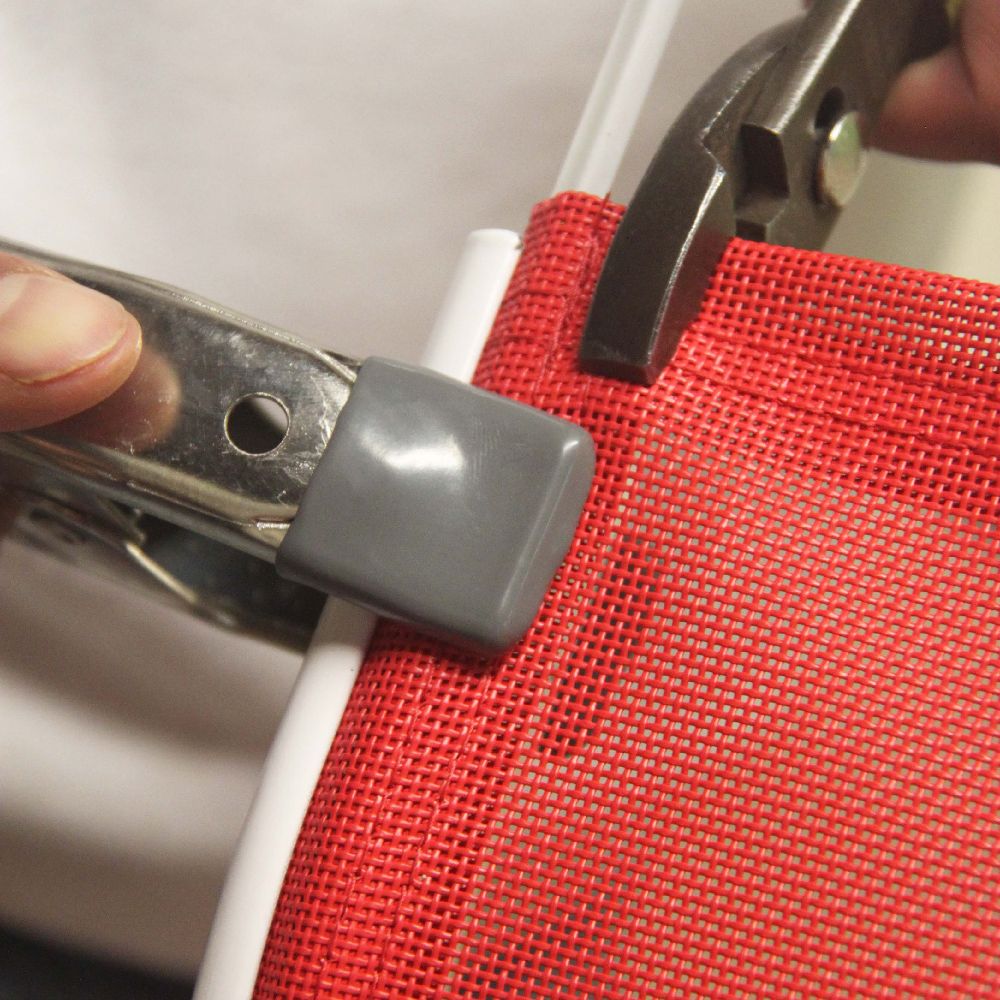
Step 11 - Cut Excess Epline and Reinstall End Caps.
Cut the excess spline with scissors or pliers and reinstall end caps into sling rails by carefully tapping them in with a rubber mallet.
X
Patio Chair Slings We Do Not Make
Are you wondering if there are certain types of patio chair replacement slings we do not manufacture?
The answer is yes!
While we specialize in custom patio slings, there are specific chair styles that we do not make slings for due to their complex design and difficult installation process.
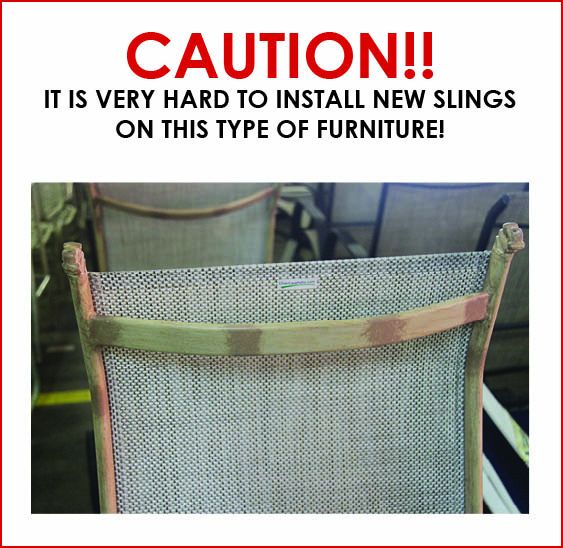
While the majority of replacement slings can be installed by the customer, there are a few that we strongly recommend you NOT try to install.
Some chairs and chaise lounges have welded stabilizer bars at the back of the frame that give the chair back strength. The stabilizer bar can not be removed making the installation and correct fit of the sling very difficult.
We highly recommend that you not attempt this type of installation at home.
As noted in our return policy during the checkout process, replacement slings are non returnable and non refundable due to the inability to install.
Please inspect your chair or chaise to determine if it has a welded stabilizer bar or a removable one BEFORE your order.
Before ordering replacement patio slings, please review the information below to ensure your chair or chaise lounge is suitable for a DIY installation.
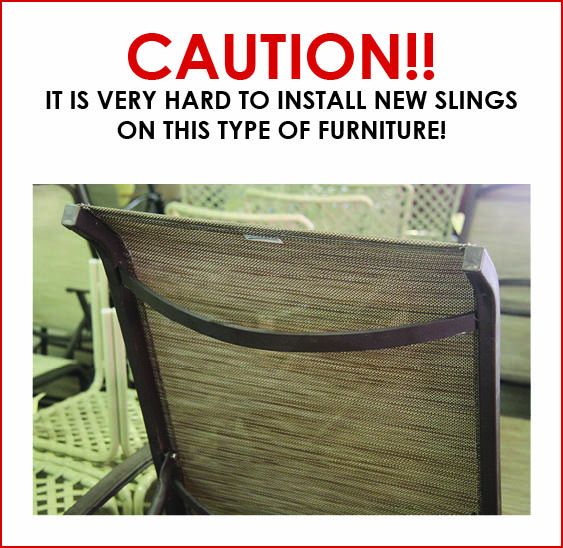
1. Chairs with Horizontal Spline (Curved Top & Tapered Bottom Seats)
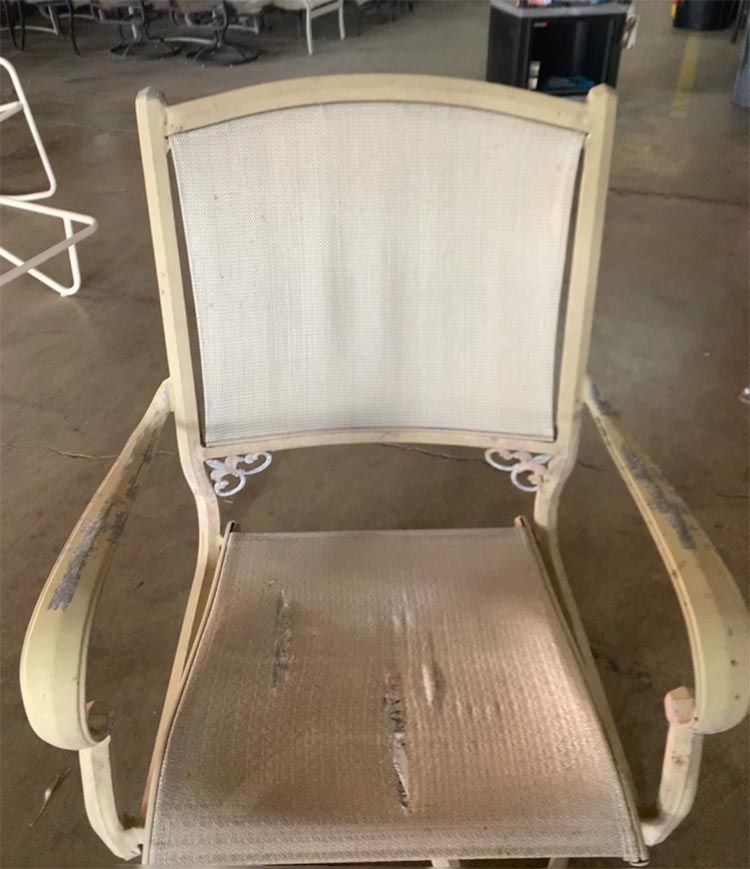
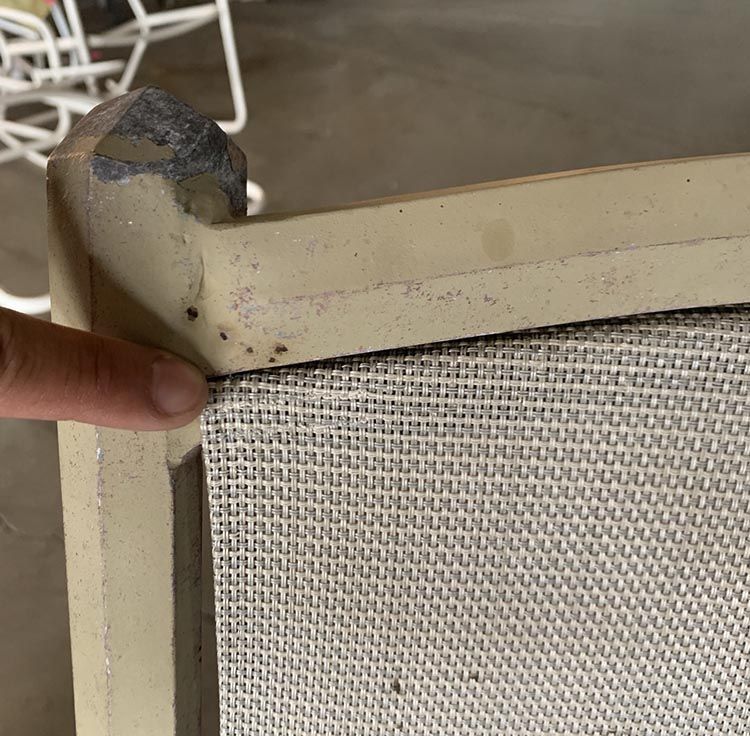
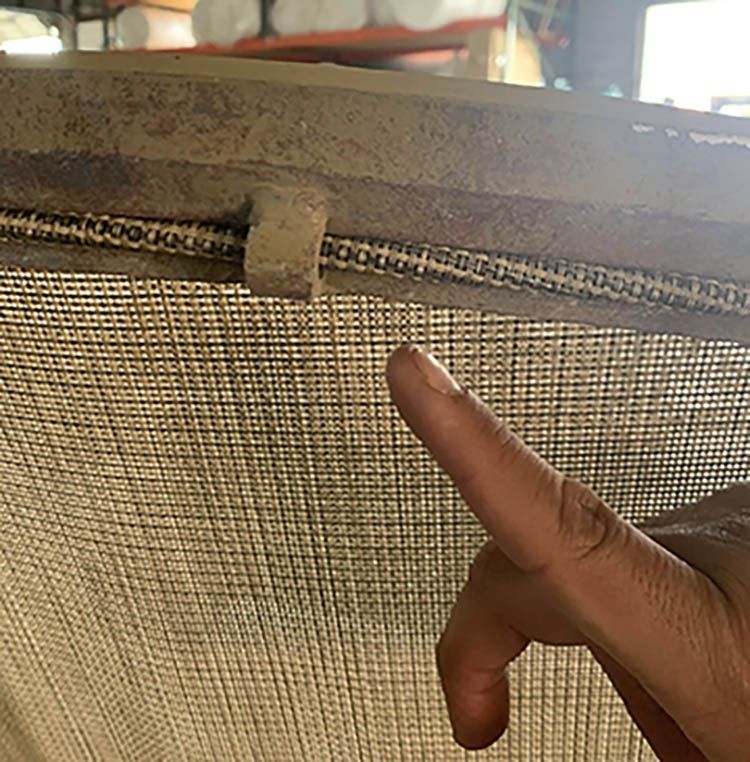
We do not manufacture slings for patio chairs where the spline runs horizontally instead of vertically. These chairs often feature:Many of these chairs were originally sold at big-box retailers, and replacing them is often more cost-effective than attempting to repair them. Sending an old sling as a pattern will not work due to inconsistent sizing. Our advice: Do not invest your time or money into repairing this style of chair.
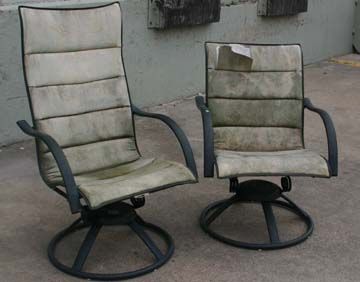
2. Patio Chairs with Welded Stabilizer Bars at the Back of the Frame
Chaise Lounges that have a welded stabilizer bar.
Some patio chairs and chaise lounges feature welded stabilizer bars at the back of the frame for added strength.
If the bar cannot be removed, installing a new sling is extremely difficult.
Important:
Our measuring formula will not work for this chair style.
These slings require professional installation.
Slings are non-returnable and non-refundable, as outlined in our return policy.
How to check your chair:
Before placing an order, inspect your chair or chaise to determine if it has a removable or welded stabilizer bar. If welded, we highly recommend contacting us before purchasing.
3. Sling Chairs with Side or Back Rail Openings
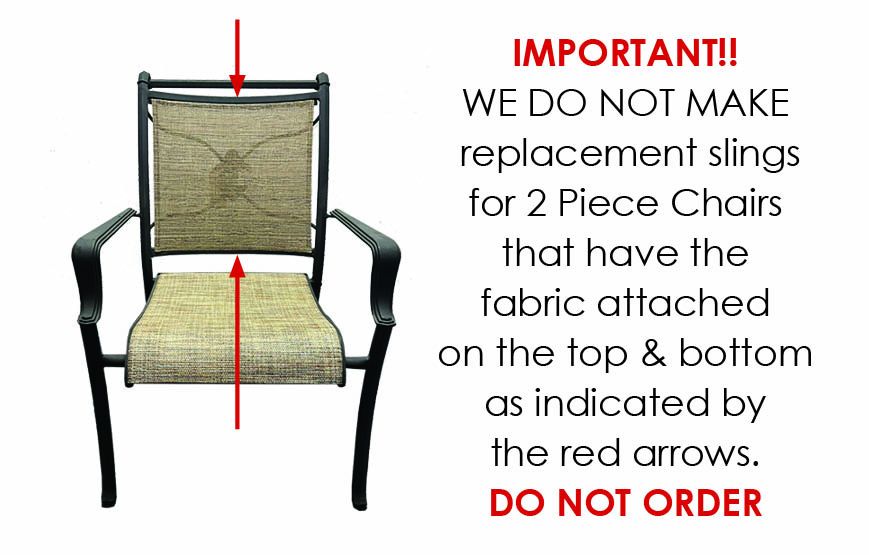
WE DO NOT MAKE REPLACEMENT SLINGS FOR HOMECREST PATIO FURNITURE!!!
DO NOT ORDER OUR SLINGS! THEY WILL NOT WORK!
Homecrest slings and padded slings are multiple layers of fabric and require patterns to make the slings properly.
We do not have the patterns for any Homecrest patio furnittiure replacement slings or cushions.

Contact us today if you’re unsure whether your chair is compatible with a replacement sling. We’re happy to help!
X
Patio Sling Replacement & Outdoor Sling Chair Repair
What Are Patio Slings and Why Do They Need Replacing?
Patio slings are durable fabric panels used in sling patio chairs, sling back chairs, chaise lounges, and outdoor sling chairs. Over time, exposure to sun, rain, and general wear can cause them to sag, tear, or fade. Instead of replacing your entire patio chair set, patio sling replacement is a cost-effective solution that extends the life of your outdoor furniture.
If you notice fraying, sagging, or faded sling chair fabric, it's time for sling chair repair or full sling chair replacement.
Best Fabrics for Patio Sling Replacement
Selecting the right sling fabric is essential for durability, comfort, and aesthetics. Here are the top options:
1. Sunbrella Sling Fabric
- Industry leader in outdoor furniture fabrics.
- Superior fade resistance, lasting years without losing color.
- Mildew, mold, and moisture-resistant, making it perfect for humid or rainy climates.
- Soft yet durable sling chair fabric that maintains its shape.
2. Phifertex Sling Fabric
- 100% vinyl-coated polyester, ensuring strength and longevity.
- Breathable mesh design allows for quick drying and airflow.
- Highly UV-resistant, making it great for sun-exposed patios.
- More affordable than Sunbrella but still an excellent choice for replacement fabric for patio chairs.
3. Twitchell Sling Fabric
- Durable, vinyl-coated polyester weave designed for patio furniture replacement slings.
- Easy maintenance—simply wipe clean with mild soap and water.
- Available in a variety of colors and patterns, making it easy to match existing furniture.
- Designed for high-traffic outdoor seating, including residential and commercial patio chairs.
How to Replace Sling Fabric on a Patio Chair?
DIY sling chair replacement is simple with the right tools.
Materials Needed:
- New sling chair replacement fabric
- Socket wrench
- Large flat-head screwdriver
- Scissors or shears
- Patio chair repair mesh or replacement sling fabric
- Sling chair replacement parts, such as plastic end caps or spreader bars
Steps for Sling Fabric Replacement:
- Remove the old sling fabric by loosening frame bolts with a socket wrench.
- Detach the sling rail, carefully sliding out the old fabric.
- Measure and cut the new replacement sling fabric slightly larger than needed.
- Scissors or shears
- Insert the new sling fabric into the rails and ensure it is evenly stretched.
- Reattach and tighten all screws and bolts to secure the fabric.
If your patio chair repair requires additional parts, sling stacking patio chair replacement kits are available to help with frame adjustments.
Frequently Asked Questions (FAQs) About Replacement Slings
1. How Do I Measure for Replacement Slings?
- Remove the old sling fabric before measuring—never measure with it still attached.
- Measure the width of the sling fabric from hem to hem (not the frame width).
- Measure the length from top to bottom, following the chair’s natural curve.
- If unsure, send us photos and measurements, and we’ll guide you in ordering the correct size.
2. Do I Need to Take Apart My Chair to Install a Replacement Sling?
Yes! The sling rails must be loosened or removed to slide in the new sling fabric.
- You will need basic tools, such as a socket wrench and screwdriver.
- Some frames have tension bars or spreader bars that must be removed and reinstalled.
3. How Long Does It Take to Replace Sling Fabric?
- For DIY installation: 30-60 minutes per chair.
- For a professional service: It may take a few days, depending on availability.
4. Can I Order Just the Sling Chair Replacement Fabric Without the Frame?
Yes! We offer replacement fabric for patio chairs, allowing you to keep your existing frame.
5. What Is the Best Fabric for High-Exposure Outdoor Sling Chairs?
- Sunbrella sling fabric is best for extreme sun exposure.
- Phifertex fabric is excellent for coastal and humid areas.
6. How Can I Make My Replacement Slings Last Longer?
- Store patio chairs in the shade when not in use.
- Clean sling fabric regularly with mild soap and water.
- Avoid sitting on the edge of the seat, as this causes unnecessary stretching.
- Use furniture covers during winter months for extra protection.
7. Do You Offer Replacement Slings for All Patio Chair Brands?
Yes! We provide replacement slings for most patio furniture brands, including:
- Tropitone replacement slings
- Homecrest replacement slings
- Brown Jordan, Woodard, Winston, and more
Simply provide your brand and measurements, and we’ll custom-make your slings.
8. Do You Offer Bulk Orders for Commercial Properties?
Yes! We provide bulk orders for:
- Hotels, resorts, and country clubs with high-traffic outdoor seating.
- HOAs and apartment complexes needing multiple replacements.
- Retailers looking for quality sling chair replacement fabric.
Why Choose Cascadia Outdoor Cushions & Replacement Slings?
- Custom-sized patio slings tailored to your furniture brand and model.
- Premium materials, including Sunbrella sling fabric, Phifertex, and Twitchell.
- Expert customer support to guide you through measurements and installation.
- Affordable alternative to new furniture—revive your patio set instead!
Order Your Custom Replacement Slings Today!
At Cascadia Outdoor Cushions & Replacement Slings, we specialize in:
- High-end sling fabrics for better-quality outdoor furniture.
- Easy online ordering—just provide your measurements, and we handle the rest.
- Fast turnaround and professional service for a hassle-free experience.
Need help? Contact us today for a custom quote!
Final Thoughts on Outdoor Sling Chair Replacement
If your patio furniture slings are sagging, torn, or faded, investing in patio sling replacement is the best way to extend the life of your outdoor seating.
With custom replacement slings from Cascadia Outdoor Cushions & Replacement Slings, you can restore your sling patio chairs, chaise lounges, and outdoor seating with high-quality fabrics built to last.
Let us help you bring new life to your patio furniture—order your replacement slings today!
X
Replacement Sling Warranty
Replacement Sling Warranty & Policies
At Cascadia Outdoor Cushions, we take pride in offering high-quality custom replacement slings designed for durability, comfort, and long-lasting performance. Before placing your order, please review our warranty, billing, return policies, and installation guidelines to ensure a smooth ordering process.
Replacement Sling Warranty
All custom replacement slings come with a one-year warranty against manufacturing defects, ensuring your slings are crafted to the highest standards.
The sling fabric itself is covered by the manufacturer's warranty, which provides three years of protection against fabric defects, fading, and strength loss under normal usage and exposure conditions.
This warranty does not cover:
- Improper installation or incorrect measuring
- Damage from misuse, extreme weather, or improper cleaning products
- Normal wear and tear, mold, mildew, or fading caused by environmental factors
- For fabric longevity, routine cleaning and proper maintenance are recommended.
Replacement Sling Return Policy
Custom replacement slings are non-returnable and non-refundable due to the inability to install them properly.
Measure carefully before placing your order, as incorrect sizes cannot be refunded.
We are not responsible for color discrepancies due to differences in screen displays. For the most accurate color match, we recommend ordering fabric samples before purchasing.
Sling Billing & Order Policy
Custom sling orders are charged in full at the time of purchase.
Since all replacement slings are made to your exact measurements and color selection, they cannot be resold or restocked.
If you are unsure about your measurements, please call us at 1-866-638-6416 before ordering. We are happy to walk you through the measuring process to ensure your slings fit properly
Sling Size Discrepancy – Please Install Before Calling
DO NOT compare the size of your new sling to your old sling. Over time, old slings stretch and expand, so a new sling may appear smaller before installation.
If your sling feels too tight, ensure you have completely disassembled the chair, loosened all bolts, and properly inserted the sling fabric into the rails.
If you are having trouble installing your sling, please refer to our sling installation video tutorials for step-by-step guidance.
Slings are non-returnable and non-refundable, but if a mistake was made in production, we will gladly adjust or remake the sling at no charge.
Errors in Sling Manufacturing by Cascadia
If your sling was manufactured incorrectly by Cascadia Outdoor Cushions, we will make adjustments at no charge.
Requests for alterations must be made within 45 days of the invoice date to qualify for free adjustments.
Any adjustments requested after 45 days will be subject to additional fees at the discretion of our sewing manager.
Errors in Measuring by Customer
If a measuring error was made by the customer, we will work with you to adjust the sling size for the best possible fit.
Alteration fees range from $10 to $20 per sling, depending on the extent of the changes needed.
All alterations must be requested within 45 days of receiving the order.
After 45 days, alteration fees will be determined on a case-by-case basis.
Sling Alteration Request
If you have followed our patio sling installation instructions and still feel your replacement sling is too large or too small, you must contact us to obtain a Sling Alteration Request Number.
Our technical support team will review your installation process and compare your original measurements to the final sling size.
If an alteration is required, you will be assigned a Sling Alteration Request Number to include when returning your slings for adjustments.
DO NOT return your slings without an assigned Sling Alteration Request Number.
Sling Alteration Tolerances
Because replacement sling fabric has a natural stretch, small variations in size do not require alterations.
We will not alter slings if the final width is within ± ¼ inch or if the length is within ± ½ inch of the original measurements.
If your sling is slightly too wide, we can send you additional sling spline, which will help tighten the fit.
Sling Installation – Important Information
Installing a new sling requires complete disassembly of the chair or chaise lounge.
Loosen the bolts at the back of the chair to allow the sling rails to fall away, making installation easier.
The new sling will be tight and must be stretched across the frame to achieve a proper fit.
We offer a low-cost spreader tool to help with stabilizer bar installation, ensuring an easier and smoother process.
Please view our sling installation videos before installing your replacement slings.
Why Choose Cascadia Outdoor Cushions for Your Replacement Slings?
At Cascadia Outdoor Cushions, we are committed to providing:
- High-quality, custom-fit replacement slings designed for durability and long-lasting performance.
- Expert customer support to help with measuring, fabric selection, and installation guidance.
- Premium outdoor fabrics with manufacturer-backed warranties to ensure maximum weather resistance.
- Flexible alteration options to help correct sizing issues for a perfect fit.
If you need assistance with measuring, installation, or alterations, we are here to help!
Contact 1-214-850-0012 to speak with one of our specialists.


